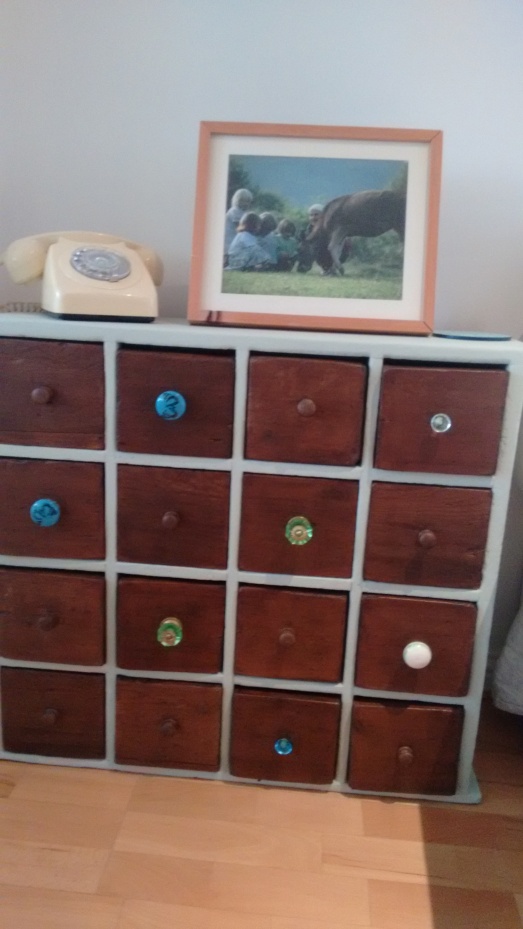
Refurbishing an Old Chest of Drawers


I fell in love with this little set of drawers when I saw it in a charity shop a few years ago, and still remember triumphantly carrying it home, after getting it for a very good price indeed.
Mr B and the boy curse these drawers, as lots of different things are kept in each drawer, but no one remembers which drawer holds what, so we inevitably find ourselves having to open and close each drawer as we search desperately for sellotape, a stapler or new batteries.


Over the years I have been slowly changing the little knobs for different interesting ones that I find on Ebay or little boutique shops. It still seemed just a little bit worn and sad looking, so I finally decided to give it a lick of paint and a little update. I got a tin of Everlong paint in ‘Cricket Pitch’ green, and painted the body of the chest of drawers. Everlong paint is a superior chalk paint inspired by the beauty of Northumberland,and I have to say it was difficult to choose just one colour, I wanted to buy all the colours and paint everything in the house. 🙂


I was very impressed with the paint, I have never used chalk paint before, always just slapping on whatever emulsion I already had, or using tester pots of paint and varnishing over the top, but this paint was very easy to use, doesn’t require primer or sanding (although I did sand down the chest of drawers as it was so battered and I wanted to smooth the surfaces). What amazed me was how quickly it dried too, even though I was painting in the freezing conservatory in the middle of October. I managed to do three coats in one afternoon. I decided to stain all the drawers, instead of painting them, and used Ronseal interior wax in Walnut finish, and I love the end result!
An Adorable Little Baby Quilt

I am very excited! Expecting my second son in two month’s time, I couldn’t wait to get started on making some little baby things! First up is a little baby quilt, one that is small enough to transport around and put on the floor anywhere to put him down on.
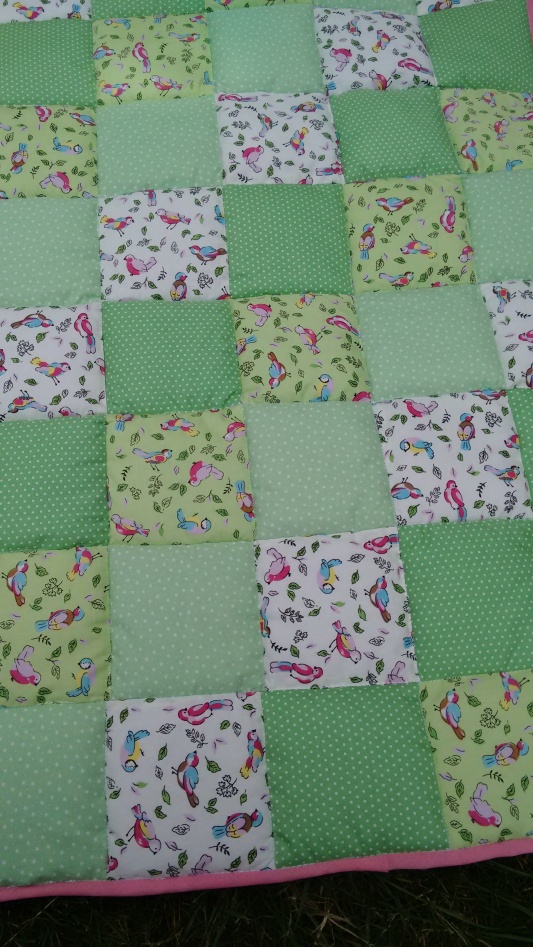
The funnest thing about this project was choosing the fabric (who doesn’t like a good excuse to buy new fabric?!) and I ended up buying a bundle of fat quarters off Ebay, in a pale green theme. I also cheated with the bias binding, using some pre-made stuff that I bought ages ago in bulk. I chose some quite thick wadding for this quilt, thicker than any of the other quilts I have made, as I wanted it to be nice and soft even on hard floors.
I actually sewed all the patches together while on holiday in France, in a little secluded forest cabin, and then finished it off once I came home. I love how it has turned out, and have already cut up all my squares for another baby quilt, this one to go in the cot, which I will blog about soon!
Making my own Save the Date cards
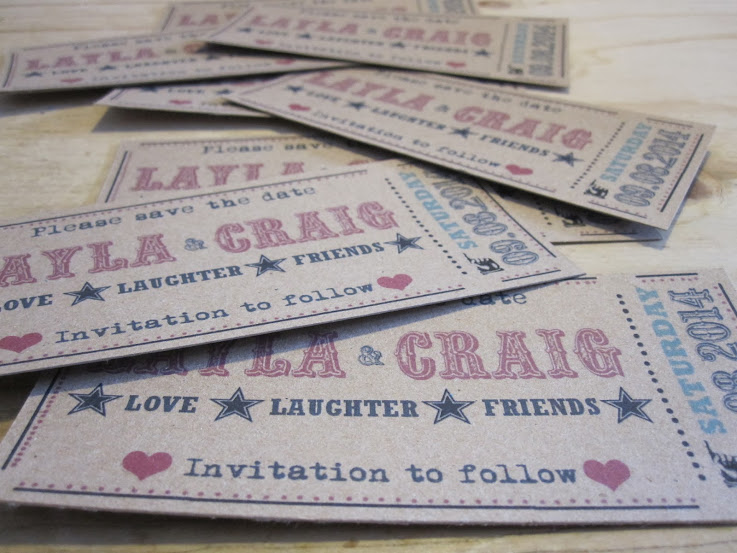
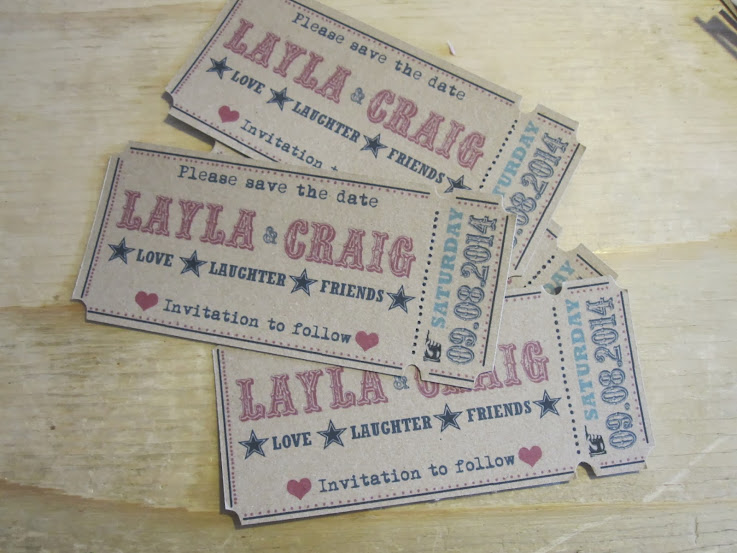
After accepting Mr. B’s proposal, I just had to get started on some wedding projects! First thing we did was find the right venue for us, which took quite a bit of searching and looking, but eventually we found the perfect place, an old mill that had a licence to conduct civil ceremonies, and which you could hire out for the whole weekend and included accommodation for all your guests. Once we had booked the venue and the registrar I got busy with my first wedding project, making the save the date cards! This was really fun, and I knew I wanted them to be like old fashioned circus tickets, so hit Pinterest and searched away for some inspiration. There were loads of good ideas on Pinterest, and I took inspiration from a few in particular and then got to work designing my own cards on GIMP. I printed them on heavy brown card and then used a circular hole punch to punch out the corners. I even used a needle to mimic the perforated edge of the ticket stub. We have decided on a small wedding so it didn’t take too long as I only had about 30 of these to make!


I’m getting married!
I am very pleased and excited to announce that the lovely Mr. B and I are getting married! He proposed in a field on one of our camping and climbing trips last year, and of course I said yes!
Since then, we have been busily planning our wedding, which will be in August, and making loads of things for it!
With both Mr. B and I being keep makers and creators, of course the wedding will have to have lots of DIY elements to it, and plenty of resourceful little ideas too!
I am sorry I haven’t blogged for so long, it’s really hard to get back into it once you let it slip I have found. I am determined to blog about all the wedding crafts and projects that we have done though, so that might spur me back into more regular posting!
Watch this space!
A Cozy Camping Quilt
This summer we went on our annual climbing and camping trip to France, and before we left I decided to quickly make a big double quilt to take with us and keep us cozy at night. Keeping with the spirit of using up my scraps this year, I looked through my fabric stash and pulled out lots of the darker colours. I figured I might as well make it a darker quilt to hide any possible camping dirt 😀 and it turned out I had quite a bit of purples, reds, blues and turquoise fabric that would do the job nicely. Because I only had a week to make this quilt, I opted for quite large squares. I did end up buying the fabric to back the quilt, but the cotton sheeting fabric was on sale and it cost me under £2, so I figured it was worth it!


I also bought two narrow feather pillows and made some pillow cases to go with the quilt, and I have to say it was very cozy at night in our tent, and far nicer than just sleeping in slippery narrow sleeping bags. We also used to quilt to wrap up in in the evenings after supper, while we stargazed outside. It was big enough for the three of us to keep warm under, and it will definitely be a permanent part of all future camping trips.


